Hubspot workflows play a key role in ensuring that your sales and marketing automations are working efficiently. While there are several ways in which you can achieve your Hubspot automations, we thought it would be helpful if we shared some of the most used workflows.
Before diving right into the actual workflows to scale your sales team lets quickly do an overview on some of the best practices.
Few General Hubspot Workflow Tips To Keep In Mind When Building Your Automations
Always Ensure That Contact Owners Based Workflows Are Grouped Under Hubspot Teams
Often you will use a lot of workflows involving contact owners (from the sales team, SDR team and so on). In order to future proof your workflows and prevent editing them every time someone joins or leaves a team, it’s best to use the Hubspot teams feature to group users under the respective teams.
Go to Settings >> Users & Team >> Teams to create your teams if you haven’t already.
Remember, you can add any user to only 1 primary team. Usually when you are creating a separate team for BDR’s add them as primary to that team inside Hubspot.

In that way you will have separate teams for BDR’s and Senior Reps. Some companies might break down their sales team based on territory or account size.
When someone joins or leaves a company there should be a automated task to add them to the respective team inside Hubspot as soon as possible.
In this way you can have 100’s of workflows running and you don’t need to go in and change the contact owner settings in each one of them.
In the the team members the workflows will take the logic the next time they get triggered inside Hubspot.
Bonus: 5 Crucial Hubspot CRM Tips for Sales Tips
Consider Re-enrolment Triggers & Merge Enrolment Of Hubspot Workflows
Re-enrollement triggers in Hubspot are crucial when you want a contact or a deal to go through a workflow multiple times. Now, keep in mind – not all triggers are eligible for re-enrollment.
Go to your triggers tab and click on re-enrollment to check if your tiggers can be automatically enrolled into the workflow every time it meets the criteria.
Another crucial setting to keep in mind when setting workflows in Hubspot is merge enrolment. Basically this means whenever you merge 2 or more contacts – do you want the workflow being triggered or not?

Depending on the situation sometimes you want to turn this option on in the workflow settings. However, in most situations you do not need this option on when setting up workflows for your organization.
Re-enrollment triggers are particularly useful when you want to run certain global workflows for your organization regardless of whether a lead is in the system or not.
For example – notify every time a lead with score of 100+ fill a certain form. In order to inform the sales team you want to turn re-enrollement on to make sure that your sales leadership is notified of all leads even if they went through the workflow before.
Keep a company wide workflow log to quickly reference any given Hubspot workflow
Workflows can often get out of hand if you are not logging them or grouping various workflows under different folders. We often audit large Hubspot accounts where they have the workflows all over the place.
The first thing that we do is go inside all of them, standardize the naming and start logging what each workflow does.
Often what this leads to is that we end up identifying multiple workflows that are somewhat duplicate. You can easily merge these workflows as part of the audit.
The key is to keep the workflow log updated so that when you hire someone new in your Hubspot marketing team, they can easily reference all of the workflows to figure out.
Now that we have covered some general tips let’s illustrate the 5 must have Hubspot workflows for any business.
Hubspot Workflow 1: Slack Notification Of Every Time A Qualified Lead Comes In For Your Sales Managers
Although Hubspot allows you to send email and internal notification, we think it’s best if you push all your fresh leads into a slack channel.
First of all determine what constitutes as as sales qualified lead (SQL) for your business. Maybe it is someone who has a high lead score and requested for a demo. SQL depends from company to company.
Anyways, once you know when a lead becomes sales qualified you should create a dedicated slack channel for it. Add all sales managers and leaders to this channel.
Create a workflow that triggers when a lead becomes SQL. For the action make sure you connect your Hubspot to your slack and create a notification for

In this way your sales managers will be notified instantly when a new sales qualified lead comes in. This system works way better than an email notification because it’s a unified channel of leads.
Try to keep the channel only for incoming notifications and use a separate channel for discussing about sales.
Hubspot Workflow 2: Demo No Show Personalized Email Sequences To Rebook Them
Before I talk about this workflow, just a quick disclaimer that you need Hubspot Sales Hub enterprise to trigger sequences from workflows.
If you do not have Sales Hub enterprise then you need to send the email using the default email marketing system inside Hubspot and cannot personalize it based on contact owner.
For this workflow to work properly you need to ensure that are two key things already set in place:
- A sales sequence that uses the dynamic meeting link in Hubspot and dynamic signature. Remember that you can add just 1 email in the sequence for a quick post demo no show follow up.
- You should already have a disposition/lead status that the sales team selects when the meeting outcome is no show. Usually some like “Demo No Show” works fine.
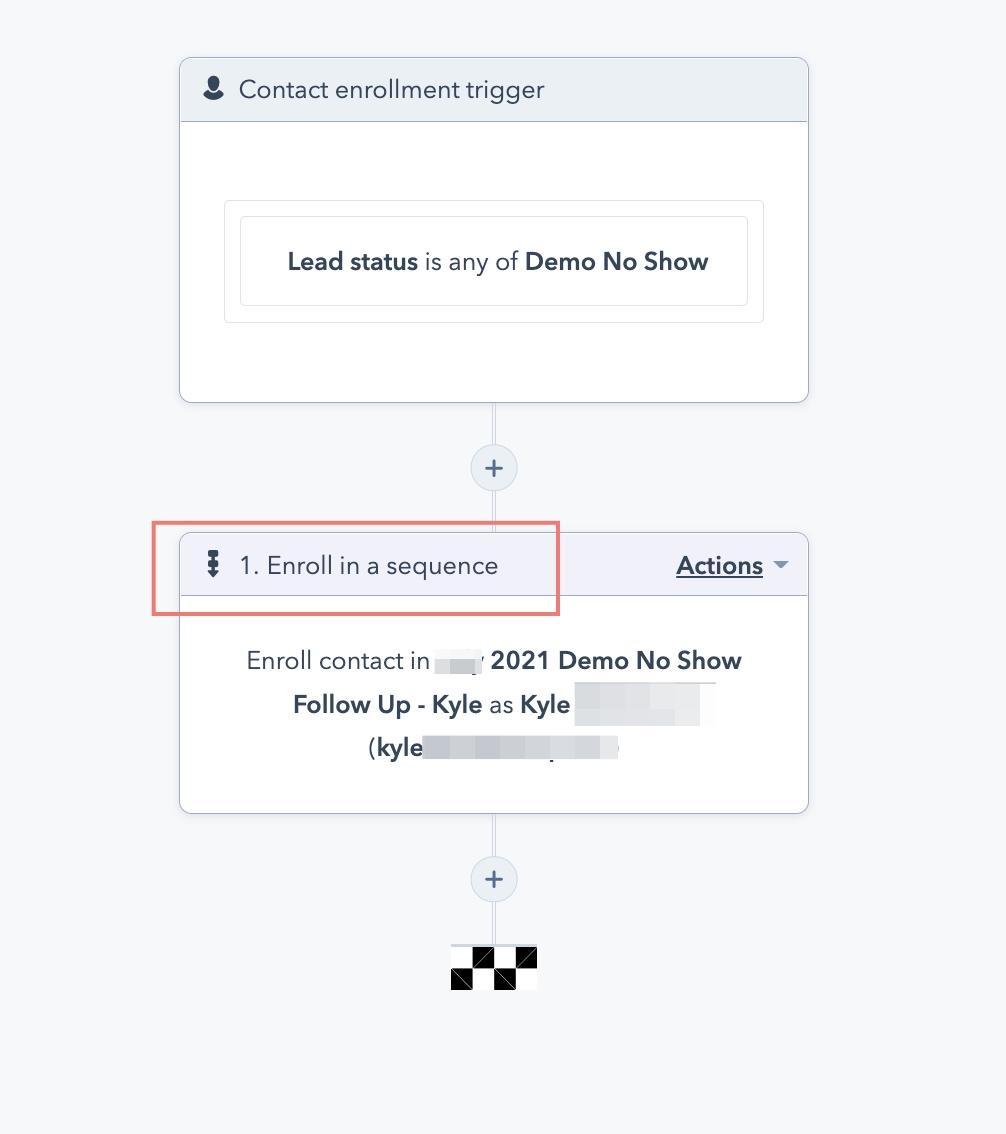
Now that you have these two elements in place, the workflow is a simple lead status disposition trigger for “demo no show” and the action will be to start a sequence (which you have already created earlier).
A general rule of thumb is to keep re-enrollment on for this workflow. This is because you may have leads that come in months later for a demo and not show up. With re-enrollment on Hubspot will still send the sequenced emails.
Finally, make sure that your reps have open time slots in their individual calendar so that you can truly measure how effective this workflow is.
Take a look at a demo no show workflow and the results it generated in re-engaging some leads that did not show up for a demo.
Hubspot Workflow 3: Contact Lead Source To A Custom Deal Lead Source Workflow
This is one workflow that definitely saves us a lot of hassle when building complicated dynamic dashboards.
If you are familiar with reporting in Hubspot that you know that not all reports can be dynamically changed with dashboard filters.
Usually single object reports work fine with dashboard filters. However, when you are creating custom reports involving multiple objects, they may not function dynamically.
With this foresight in mind we think is a good idea to copy the lead source or the UTM sources as duplicate properties for all your deals.
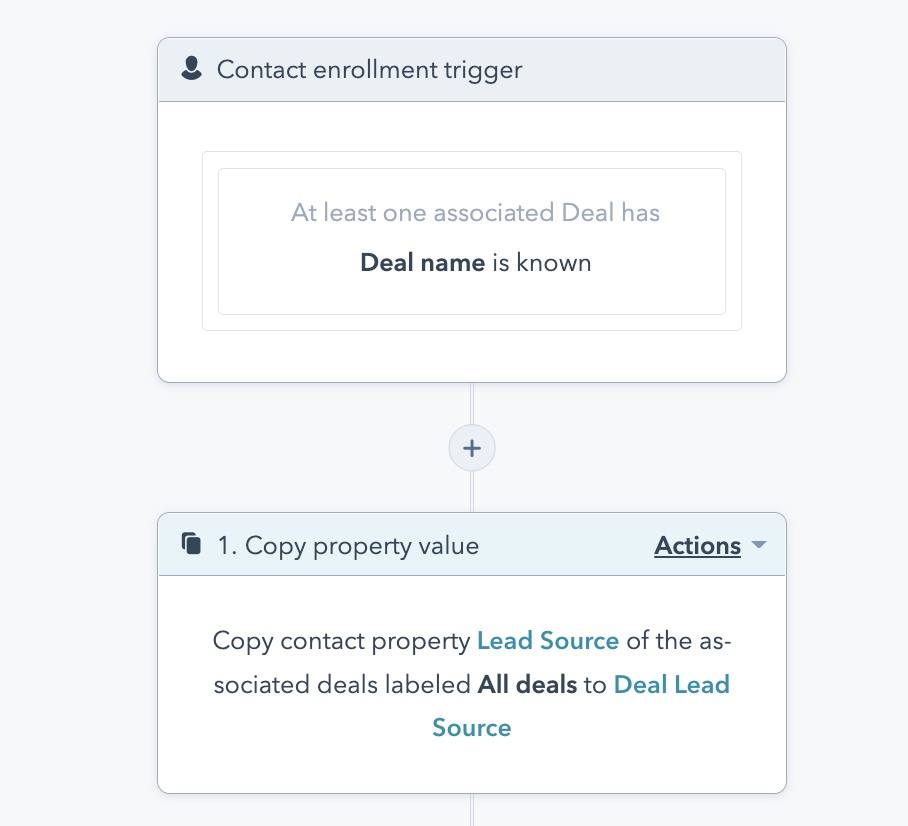
Ensure that you already have an established lead source field for your contacts. The lead source should be populated for all incoming leads.
When you create a deal (which can be based on another workflow or manually entered) – you need to trigger a workflow that copies one property from your contact to a property in your deal card.
When you are done – make sure that you run the workflow for all existing deals that meet the trigger. In this way all legacy workflows will be updated.
Hubspot Workflow 4: Creating SMS outreach as soon as someone revisits important pages like pricing page
Another effective workflow that works really well in engaging prospects is for you to send a personalized text message every time someone visits an important page.
In order to send text messages you need to make sure that your dialler is integrated with Hubspot workflows.
If your dialler has Hubspot workflow integrations then it’s extremely easy to create this workflow and boost sales engagement.
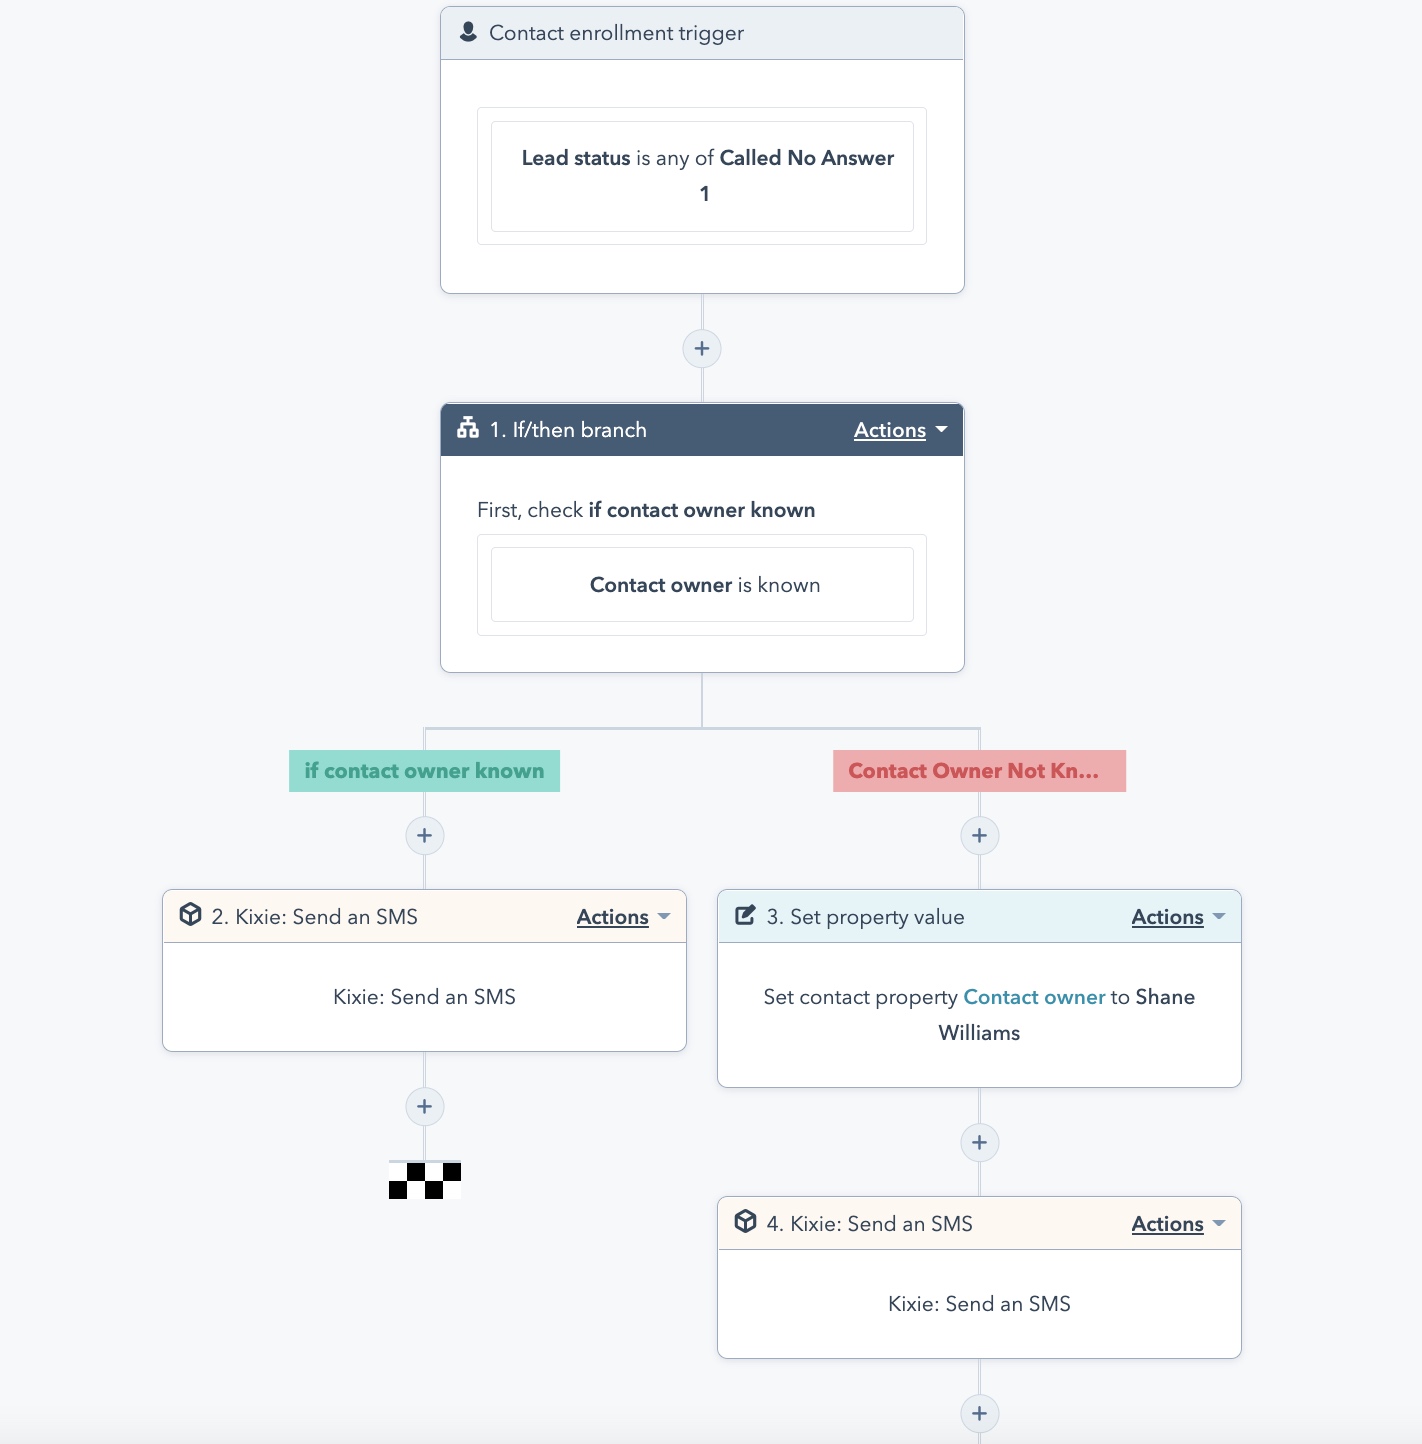
Here’s how this workflow works:
- For the trigger we are going to use certain page views as the main trigger.
- Depending on your sales team you can even use addition filters like lead score or days before last contact to refine the process.
- For the action simply use the send SMS action and it will send a text as your contact owner.
A good failsafe to build in this workflow is to account for contacts that do not have a contact owner.
When a contact owner is not found, first assign them a new contact owner and then send the text.
Hubspot Workflow 5: Call Tasks For Leads That Your Sales Team Could Not Connect With
This workflow is extremely crucial for pretty much any sales leaders and managers.
Hubspot tasks can be a powerful tool when implemented properly across your sales team.
The first thing you need to do is create a dedicated task queue. This queue should populate all the tasks that come in from your workflow.

The trigger for this workflow usually starts with a “Call Attempt 1 or Call No Answer 1” type disposition/lead status.
For the action you can create call tasks for the next day. In Hubspot if your next day falls on a Saturday it will automatically be routed to your next working day.
When the workflow is live ask your sales manager to keep an eye out for their sales team’s queue and hold then accountable for the follow ups.


0 Comments